目的:
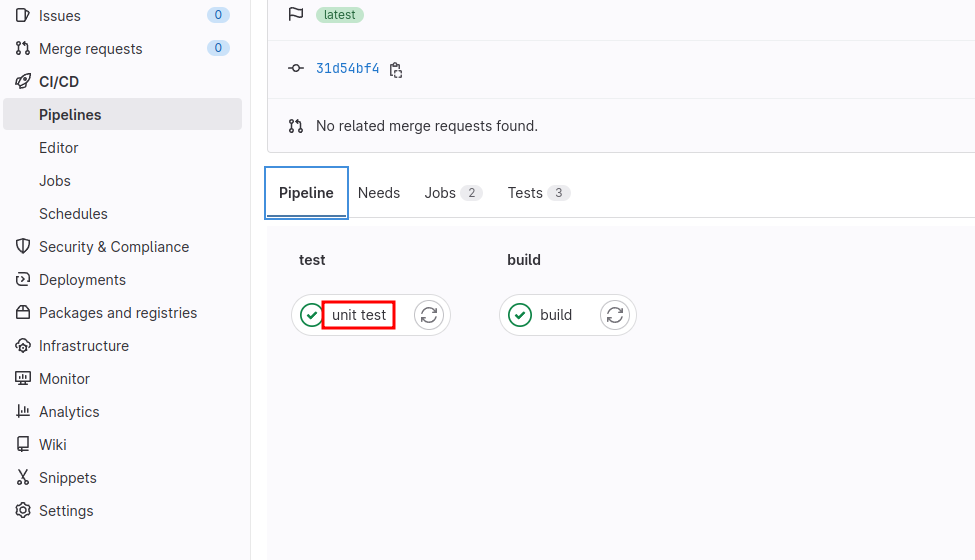
主要是透過撰寫 .gitlab-ci.yml 來讓Gitlab 自動幫我跑 unit test 並且由於Gitlab 可以透過Stage by Stage的方式當Unit Test 有錯的時候就可以讓下一個 Stage( 例如: build)就不會執行的Flow達到單元測試沒過就不會做打包的流程。
流程:
這邊我們用的範例是透過 Angular Cli 建立一個簡單的專案並且採用Angular 預設建立的 Unit Testing 來作為我們單元測試的程式碼。
1. 建立Angular 專案
- 在 Command Line 下面使用 Angular Cli 建立專案 。
$ ng new SetupGitUnitTest --routing --style=scss
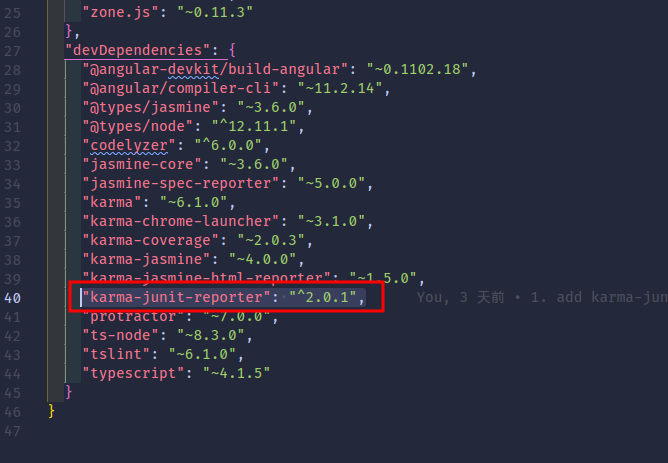
2. 安裝 karma-junit-reporter 在專案裡
- 由於Gitlab的Report是透過 Junit 產生的XML報表顯示在Gitlab 的CI/CD的 Pipeline Test 頁籤裡面,因此我們必須安裝 karma-junit-reporter 來讓 Karma 可以把結果轉成 Junit XML 檔。
$ cd SetupGitUnitTest
$ npm install -D karma-junit-reporter
- 這邊我們會透過修改 karma config 來讓 junit 可以吐出 xml 檔並且告知 karma 在測試時不要使用一般的 Chrome 當作Report,因為在一般的Server 是沒有GUI界面的!所以我們要請 karma 使用 Headless Chrome 來運行在 Server裡。
- 修改部份請參閱註解有 👈 部份:
module.exports = function (config) {
config.set({
basePath: '',
frameworks: ['jasmine', '@angular-devkit/build-angular'],
plugins: [
require('karma-jasmine'),
require('karma-chrome-launcher'),
require('karma-jasmine-html-reporter'),
require('karma-coverage'),
require('@angular-devkit/build-angular/plugins/karma'),
require('karma-junit-reporter'), // 👈 import junit reporter
],
client: {
jasmine: {
// you can add configuration options for Jasmine here
// the possible options are listed at https://jasmine.github.io/api/edge/Configuration.html
// for example, you can disable the random execution with `random: false`
// or set a specific seed with `seed: 4321`
},
clearContext: false // leave Jasmine Spec Runner output visible in browser
},
jasmineHtmlReporter: {
suppressAll: true // removes the duplicated traces
},
coverageReporter: {
dir: require('path').join(__dirname, './coverage/SetupGitUnitTest'),
subdir: '.',
reporters: [
{ type: 'html' },
{ type: 'text-summary' }
]
},
reporters: ['progress', 'kjhtml', 'junit'], // 👈 add junit reporter
junitReporter: { // 👈 add junit reporter configuration.
outputDir: '', // 👈 results will be saved as $outputDir/$browserName.xml
outputFile: 'unit-test-results.xml', // 👈 change this to your preference.
suite: '',
useBrowserName: false,
nameFormatter: undefined,
classNameFormatter: undefined,
properties: {}
},
port: 9876,
colors: true,
logLevel: config.LOG_INFO,
autoWatch: true,
browsers: ['Chrome', 'ChromeHeadlessCI'], // 👈 add ChromeHeadlessCI
customLaunchers: { // 👈 add ChromeHeadlessCI configuration
ChromeHeadlessCI: {
base: 'ChromeHeadless',
flags: [
'--no-sandbox'
]
}
},
singleRun: false,
restartOnFileChange: true
});
};
- 我們把 junit 加到 plugin 裡面去。
- reporter 新增的 junit。
- junit report 會自動在專案下產生 'unit-test-results.xml' 報表。
- 瀏覽器的設定裡面加入了 ChromeHeadlessCI 並且對這個瀏覽器做了客製化設定。
4. 新增 unit test script 在 package.json 裡面
- 由於Angular Cli 已經有提供執行單元測試的指令,所以我們把指令寫在package.json 裡,到時候透過 .gitlab-ci.yml 來呼叫 npm 來執行 Angular 的單元測試指令。
- 這邊我們在 "scripts" 區段加入 "test:ci" 來呼叫 Angular Test command
- --browsers :
- 這邊 ChromeHeadlessCI 是告訴karma在運行的 browser 請選擇這個我們在 karma.conf.js 裡面設定的這個客製化的browser 。
- --no-watch :
- 如果我們沒有加入這個參數,Karma 會一直監視程式碼。一旦有任何變化就會再做一次單元測試並且開啟瀏覽器(就算你自己關閉瀏覽器 Karma 也會自己打開設定好的瀏覽器)。但是我們只是要一次性的單元測試,所以要把這個參數加入。
5. 告訴 Git 排除 unit-test-results.xml 這個檔案
- --browsers :
- 這邊 ChromeHeadlessCI 是告訴karma在運行的 browser 請選擇這個我們在 karma.conf.js 裡面設定的這個客製化的browser 。
- --no-watch :
- 如果我們沒有加入這個參數,Karma 會一直監視程式碼。一旦有任何變化就會再做一次單元測試並且開啟瀏覽器(就算你自己關閉瀏覽器 Karma 也會自己打開設定好的瀏覽器)。但是我們只是要一次性的單元測試,所以要把這個參數加入。
- 由於我們可能會在 Local 做測試 (直接在command line 輸入 ~ npm run test:ci )所以要 Git 忽略單元測試後產生的 unit-test-results.xml 不要把這個檔案當作 source code 的一部分。
- 在專案下的 .gitignore 檔案最後一行加入下方內容:
# unit test result
unit-test-results.xml
6. .gitlab-ci.yml 撰寫
- 首先我們在專案下新增 ' .gitlab-ci.yml ' 這個隱藏檔,當我們將code push 到 Gitlab 的時候如果Root folder 下有這個檔案,Gitlab 會讀取這個檔案來依據內容做事。
- 內容如下~待我慢慢解釋。
image: node:16.19.0-bullseye
cache:
paths:
- node_modules/
stages:
- test
- build
unit test:
stage: test
before_script:
- apt-get update
- wget https://dl.google.com/linux/direct/google-chrome-stable_current_amd64.deb
- apt install -y ./google-chrome*.deb;
- export CHROME_BIN=/usr/bin/google-chrome
- npm install -g @angular/cli@11.2.19
script:
- npm ci --legacy-peer-deps
- npm run test:ci
artifacts:
reports:
junit: unit-test-results.xml
build:
stage: build
before_script:
- npm install -g @angular/cli@11.2.19
script:
- npm ci --legacy-peer-deps
- npm run build
- image
- 告知 Gitlab 去 docker hub 上面拉一個我們需要的Container 來當作這個CI/CD的環境。這邊我們直接拉 nodejs 16.19.0 這個 Container 這樣我們就不用手動安裝 nodejs 在CI/CD上面。
- cache
- 告知 Gitlab 在CI/CD結束之後把 Path 指定的路徑下暫存起來,這樣就不用每次都要重新下載 node_modules 的第三方 Library.
- stages
- 這邊我們有兩個 stage : test 跟 build
- Stages 會依照我們寫的順序一個一個往下執行。當其中一個Stage Failed 了,Gitlab 就會中斷不會執行下一個 Stage。
- unit test
- 一個設定區塊的名稱。
- stage : test
- 跟 Gitlab 講這個 unit test 的設定是屬於 test 這個 Stage的。
- before_script
- 跟 Gitlab 講在執行 script 的內容之前先執行 before_script 的內容。
- 由於 node container 本身沒有 Chrome 瀏覽器,所以我們在這邊用手動的方式來安裝 Chrome 瀏覽器,不過我們本身用的是 Chrome 本身提供的 Headless Chrome (詳細看 karma.conf.js)。
- 更新 APT
- 透過 wget 下載 Chrome
- 透過 APT 安裝 Chrome
- 設定bash環境
- 最後透過 npm 安裝 Angular Cli 在 Node js Container 裡面。
- script
- Gitlab 會在Container內執行這些Script。
- npm ci --legacy-peer-deps
- 安裝專案會用到的 Library。 Gitlab 會參考專案的package.json 安裝需要的Library。 用 npm ci --legacy-peer-deps 的優點是不會更新 package-lock.json 內容,並且如果遇到有相依性問題的Library 忽略相依性的問題並且依照各自的Library安裝相依的套件。
- npm run test:ci
- 執行 單元測試。
- artifacts
- 跟 Gitlab 講 Junit Report 的檔案名稱與位置在哪邊。
- build
- 一個設定區塊的名稱。
- stage : build
- 跟 Gitlab 講這個 build 的設定是屬於 build 這個 Stage的。
- before_script
- 跟 Gitlab 講在執行 script 的內容之前先執行 before_script 的內容。
- 這邊我們安裝 Angular Cli 在Global
- script
- Gitlab 會在Container內執行這些Script。
- npm ci --legacy-peer-deps
- 安裝專案會用到的 Library。 Gitlab 會參考專案的package.json 安裝需要的Library。 用 npm ci --legacy-peer-deps 的優點是不會更新 package-lock.json 內容,並且如果遇到有相依性問題的Library 忽略相依性的問題並且依照各自的Library安裝相依的套件。
- npm run build
- 執行Angular 打包。
由於Angular的打包我是透過 Jenkins 來做所以我自己會把 build stage 整個註解掉。讀者可以依自己需求修改 .gitlab-ci.yml 內容或是再新增更多的 Stage.
Push Code
最後將這三個檔案更新 Push 上去然後就可以看看Gitlab 的 CI/CD那邊運行的結果有沒有錯誤了。
Test Stage
- Setup Gitlab CI in Angular Application - YouTube
- Document Gitlab CI YAML
- Source Code in GitLab


留言
張貼留言